Edit multiple inventory items with Bulk Edit
The Bulk Edit function allows you to select multiple items in inventory management to update simultaneously. You can not use Bulk Edit to change an items status. For example, you cannot bulk edit a mass disconnect of items or services. Changes will only be applied to services or items that make sense for that specific item. The changes in Bulk Edit are of type “Many to One”.
Note: You can only select items that are Active and are not in transaction.
Open Bulk Edit
- Go to Inventory > Inventory Management.
-
Select the items' checkbox to edit. An item counter appears at the top of the grid or card view.
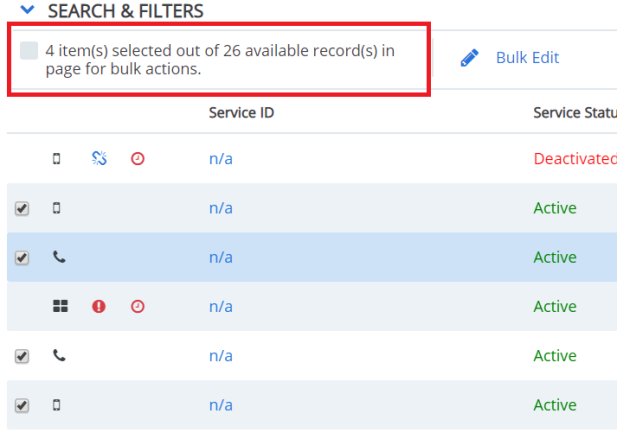
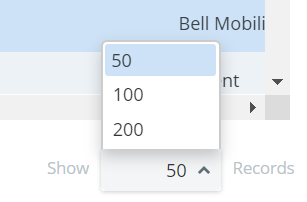
Note: The Select All option beside the item counter only selects the available records on the current page. If you need to select items on multiple pages, you have to navigate the other pages and repeat the bulk edit process. You can increase the number of items displayed on each page and therefore the amount you can select by increasing the Show Records number at the bottom right corner of the grid.
- Click Bulk Edit. The Bulk Edit page opens.
Note: If you select items to bulk edit but do not complete the process and do not click Cancel or if another user has selected items for a bulk edit, Cimpl will lock those items for 2 to 4 hours. You can edit those items again after the 2 to 4 hours depending on the amount of items selected.
The Bulk Edit page
The Bulk Edit page is where you can update, remove or add information. The page is broken up into sections and each field has a selection box and a drop-down menu. Some sections on the page are dependent on information provided in a previous section. Not all fields can be edited in Bulk Edit. Fields such as ESN, IMEI, Service ID and SIM must be unique and therefore are excluded from the Bulk Edit page.
Service Information
If the selected services have different Provider or Service type, you have to choose common values in order to update fields dependent on the Service Information.
- Select Provider to activate selection drop-down.
- Select a Provider. This will change all selected inventory items to have a common provider.
- Select Service Type to active selection drop-down.
-
Select Service Type.The options available in the drop-down are dependent on which Provider you selected.
Fields Dependent on Service Information
You will always have the option to Remove but the other options will vary depending on the selections made in the Service Information section.
- Select Account to activate selection drop-down.
- Select an Available Change.
- If you select Update, click the +. An account list pop-up opens.
- Click on the account entry to add.
- Select Contract to activate selection drop-down.
- Select an Available Change.
- If you select Update, click the +. A contract list pop-up opens.
- Click on the contract entry to add.
- Update applicable fields.
- Select Option to activate selection drop-down.
- If you select Add:
- Select an Option Type.
- Fill in cost information.
Click Add.
Note: If the option is already part of the service contract for a given service, then the option is not added.
- If you select Add:
- Select Device/Accessories to activate selection drop-down.
- If you select Add:
- Select Asset Type.
- Select Asset.
Click Apply. The item appears in line.
Note: The Add Even if Exist selection option will add the asset even if the service or item already has a the same device/asset. For example, if you want to add a car charger but the service already has one, it adds it and the service has two. If you do not select Add Even if Exist, Bulk Edit does not add a duplicate asset.
If you select Remove All, select a Device Status.
Note: All the removed assets is move to Cimpl's Default Warehouse.
- If you select Add:
Fields Dependent on Compatibility Configuration
Note: If you don't change the Service Type, then it will show all services attributes based on the selected services for bulk edit. But if you do change the Service Type in the edit form, then the service attributes displayed is for that particular service type, since the selected item will now become that service type. If you leave an entry empty, it will remove the current value.
- Select the Service Attribute. A sub menu of options appears.
- Fill in attribute information.
Fields Independent of Any Compatibility Configuration
Note: You can update the fields in this section even if you haven't selected or changed any information in the previous sections.
- Select Assignment to activate selection drop-down.
- Select Department or Employee.
- Select Available Changes. The Available Changes options depend on whether you select Employee or Department.
- If you select Employee and Add, click the + Select to add the employee. You can specify if you want to make it the primary employee or not.
If you select Employee and Replace Primary, click + Select to add the employee.
Note: All existent primary employees are replaced by the new one. If the service has no employee, it is added.
- If you select Department, then the services is all assigned to the selected department.
- Select Address to activate selection drop-down.
- Select Remove All or Update.
- If you selected Update, select Assignee Address (the address is based on either the employee or the department that owns the service) or Other Company Address. (a defined address in your organization).
- Select Used For to activate selection drop-down.
-
Select one of the following: Add , Remove All, Find & Replace, Find & Remove, Replace All or Remove All.
Note: Existing Used For tags will remain assigned to the services. If the Used for tags already exist for a service, it is not added.
- If you select Add,Find & Replace, or Find & Remove, enter a Used For tag in the search box.
-
For Add, click to add Used For tag.
Note: You may be required to enter an extra quantity for an added Used For tag. If a given service has that Used For tag already, then the quantity is updated
- For Find & Replace, enter a Used For tag in Replace With.
- For Find & Remove, click a Used For tag to remove.
- For Replace All, click the Used For to replace.
- Select Rules to activate selection drop-down.
- Select one of the following: Add, Find & Replace, Find & Remove, Replace All or Remove All.
- If you select Add, Find & Replace, Find & Remove, Replace All, enter a Rule in the search box.
- For Add, click to add a Rule.
- For Find & Replace, enter a Rule tag in Replace With.
- For Find & Remove, click a Rule tag to remove.
- For Replace All, click the Rule to replace.
- Select Comments to activate selection drop-down.
- Select Append, Remove All or Update.
Note: Append adds a comment, Update replaces the existing comment, and Remove All deletes all existing comments.
Complete the Bulk Edit
- Select the Acknowledgment statement.
-
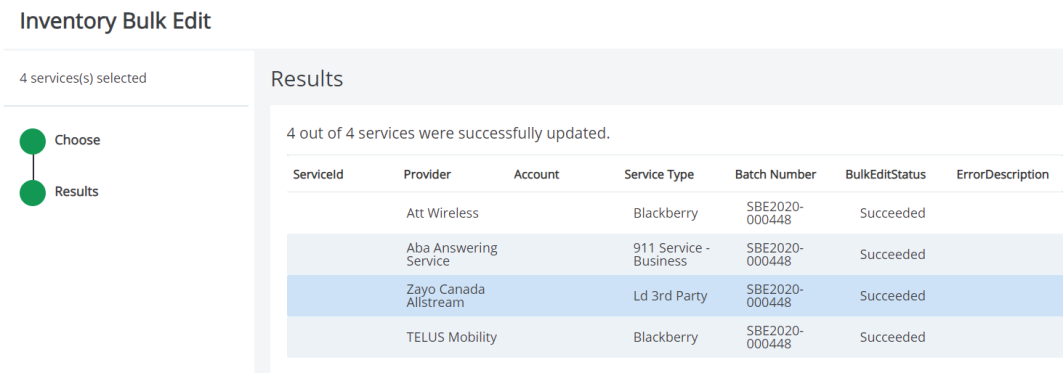
Click Apply. The Results Page opens.
Note: If you have not selection options properly or did not fill out required fields, you will receive prompt to provide the missing or incorrect information.
-
Review the Results page. The Results page will list if the updates were successful and list any errors that occurred.
Error Messages
| Message | Description |
|---|---|
| Service No Longer Exist | While the user was completing the bulk edit, a back end load removed the service. |
| Possible Duplicate | By changing the account or provider, you would create a possible duplicate service in the system. |
| Service has Pending Changes | While the user was completing the bulk edit, a back end load created a change in the inventory so the item no longer matches the state it was in when the user started the bulk edit. |
| Service has Been Updated | Similar to Service has Pending Changes. While the user was completing the bulk edit, a back end load created a change in the inventory so the item no longer matches the state it was in when the user stated the bulk edit. |
Export data
- Click Export. A Excel document download begins automatically.
View the history of changes for an item
The history for any changes to an item is available on each item's record. You can review all changes made in Bulk Edit.
- Open Inventory Management, click Inventory > Inventory Management.
- Click the item's record to open.
- Expand History.
-
Select From and To dates. The history updates below.
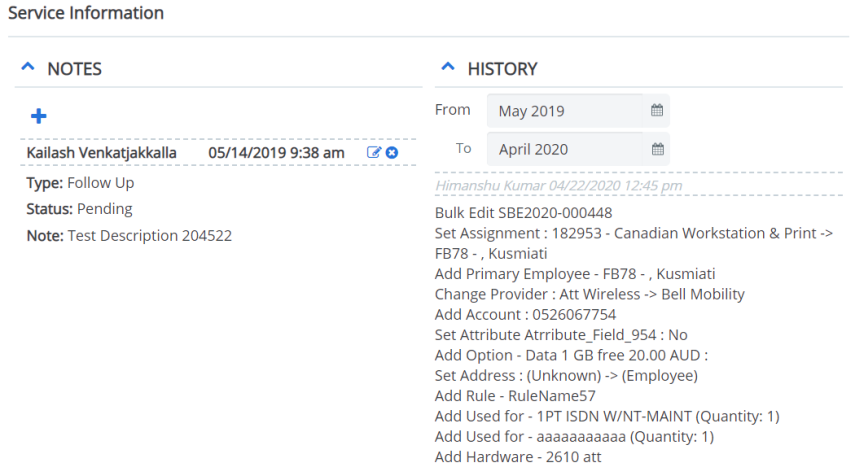
Note: If there have been multiple Bulk Edits for the same item, the changes is organized under their Bulk Edit batch number.